

Injection molding follows five distinct phases to transform raw plastic into finished components: clamping, injection, cooling, opening, and ejection. The clamping phase secures the mold halves together, injection fills the cavity with molten plastic, cooling solidifies the material, opening separates the mold halves, and ejection removes the finished part. Understanding these phases helps manufacturers optimize cycle times and improve product quality.
What exactly happens during the injection molding process?
Injection molding is a manufacturing process that creates plastic components by injecting molten material into precisely machined molds. The process transforms plastic pellets or granules into complex three-dimensional components through controlled cycles of heating, pressure, and cooling.
The basic concept involves heating thermoplastic material until it reaches a molten state, then pressing this liquid plastic under high pressure into a closed mold cavity. Once the material cools and solidifies, the mold opens and releases the finished part. This process can produce thousands of identical components with exceptional precision and repeatability.
Understanding each process phase is important because manufacturers can identify bottlenecks, reduce waste, and improve overall efficiency. Each phase affects the quality of the final product, dimensional accuracy, and surface finish. When manufacturers understand how time, temperature, and pressure work together throughout the cycle, they can make informed changes that increase productivity while maintaining consistent quality standards.
What are the 5 fundamental phases that make injection molding work?
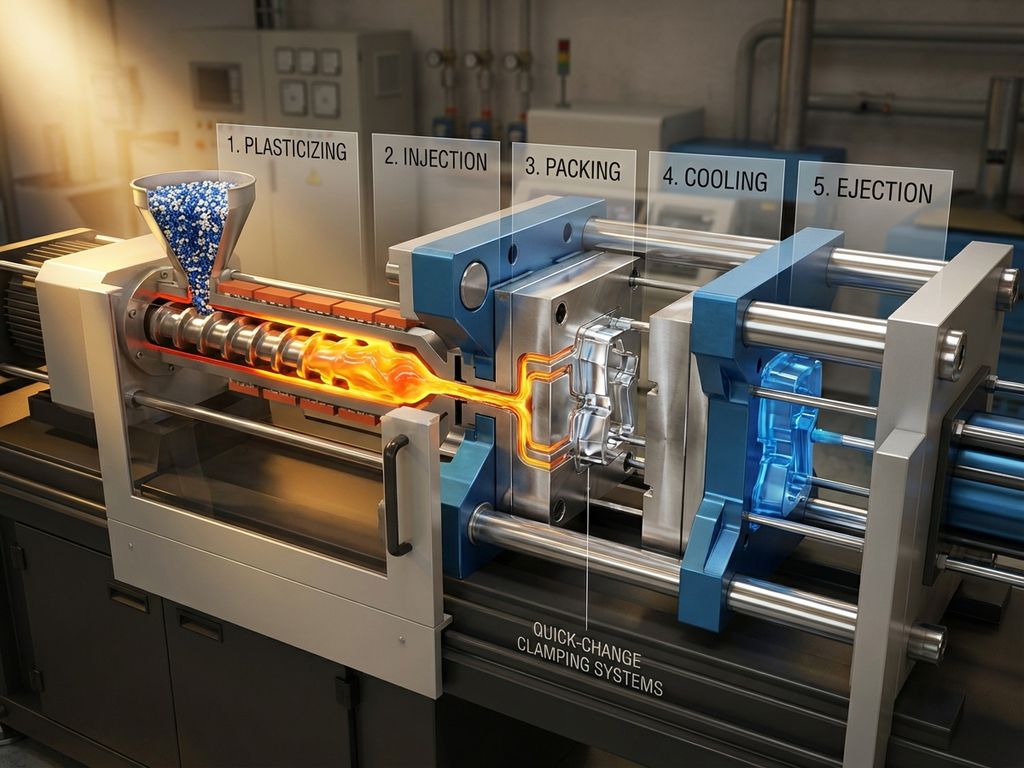
The injection molding cycle consists of five sequential phases: Clamping, Injection, Cooling, Opening, and Ejection. Each phase serves a specific purpose and contributes to the quality and dimensional accuracy of the final product.
Clamping unites the two mold halves by applying sufficient force to keep them closed during injection. This phase typically lasts 2-5 seconds and ensures the mold remains sealed against the high injection pressures. The clamping force must overcome the separating force generated by the molten plastic to prevent flash or incomplete parts.
Injection pushes the molten plastic through the sprue, runners, and gates into the mold cavity. This phase normally lasts 1-3 seconds but requires precise control of injection speed, pressure, and temperature. The plastic must completely fill the cavity before it begins to cool and solidify.
Cooling allows the molten plastic to solidify within the mold cavity. This longest phase typically accounts for 60-80% of the total cycle time and varies from 10-120 seconds, depending on part thickness and material properties. Adequate cooling ensures dimensional stability and prevents warping.
Opening separates the mold halves once the part has sufficiently cooled. This quick phase lasts 1-3 seconds and must be executed carefully to avoid damage to delicate part features or mold surfaces.
Ejection removes the finished part from the mold using ejector pins, plates, or other mechanisms. This final phase lasts 2-5 seconds and requires gentle force to avoid part distortion or surface damage.
How long does each phase of the injection molding cycle take?
Cycle times vary significantly based on part size, material type, and mold design, but typical ranges provide useful guidelines. Clamping takes 2-5 seconds, injection requires 1-3 seconds, cooling dominates with 10-120 seconds, opening needs 1-3 seconds, and ejection lasts 2-5 seconds.
The cooling phase represents the greatest opportunity for cycle time optimization. Wall thickness has the greatest impact on cooling time, with thicker sections requiring exponentially longer cooling periods. A part with 2mm walls might cool in 15 seconds, while 4mm walls could require 60 seconds or more.
Material properties significantly influence time requirements. Crystalline materials like polyethylene require longer cooling times than amorphous materials like polystyrene. Mold temperature also affects cycle time, with higher temperatures prolonging cooling but potentially improving surface finish and reducing internal stresses.
Manufacturers can optimize times through various approaches. Conformal cooling channels follow part geometry for more uniform heat removal. Proper gate placement ensures balanced filling and reduces injection time. Advanced mold materials with better thermal conductivity can reduce cooling time without compromising part quality.
What can go wrong during each phase of injection molding?
Each phase of injection molding presents specific challenges that can affect part quality and production efficiency. Clamping problems include insufficient force leading to flash, misalignment causing parting line issues, and excessive force damaging mold components.
During injection, common problems include short shots when plastic doesn’t completely fill the cavity, usually caused by insufficient injection pressure, blocked gates, or material that’s too cold. Over-packing can create excessive internal stresses that lead to warping or cracking after ejection.
Cooling phase issues often manifest as warping, sink marks, or dimensional instability. Uneven cooling creates internal stresses that warp parts. Insufficient cooling time results in parts that deform during ejection, while excessive cooling reduces productivity without quality benefits.
The opening phase can cause problems when parts stick to the wrong mold half or when delicate features break during separation. This typically results from insufficient draft angles, poor surface finish, or inappropriate ejector system design.
Ejection difficulties include parts that stick in the mold, ejector pin marks on visible surfaces, or part distortion due to excessive ejection force. These problems often arise from inappropriate draft angles, insufficient ejector area, or improper ejector pin placement.
How can manufacturers optimize their injection molding process?
Optimizing injection molding requires systematic attention to each process phase and their interactions. Process monitoring provides the foundation for improvements by tracking key parameters like injection pressure, mold temperature, and cycle times to identify trends and variations.
Material preparation significantly affects process efficiency. Proper drying eliminates moisture that can cause surface defects and dimensional variations. Consistent material temperature ensures predictable flow properties and reduces cycle-to-cycle variation.
Mold design optimization focuses on balanced runner systems that fill all cavities simultaneously, adequate venting to prevent air entrapment, and strategic gate placement that minimizes flow path length and pressure requirements. Conformal cooling channels provide more uniform temperature control than traditional straight-drilled channels.
Machine settings require careful calibration to match material properties and part requirements. Injection molding optimization involves finding the optimal balance between injection speed, pressure, and temperature that produces quality parts in minimal cycle time. Statistical process control helps maintain these optimal settings over time.
Preventive maintenance keeps equipment running efficiently and prevents quality issues. Regular cleaning, lubrication, and inspection of components reduce unexpected downtime and maintain consistent process conditions. Predictive maintenance using vibration analysis and thermography can identify potential problems before they affect production.
How EAS Quick-Change Systems Accelerate Injection Molding Efficiency
Quick-change mold technology drastically reduces the time between production runs, enabling manufacturers to switch between different parts in minutes rather than hours. This capability transforms the economics of injection molding by making small-batch production profitable and reducing inventory requirements.
Our comprehensive product range addresses every aspect of mold changeover:
- Adaptive clamping systems eliminate manual bolting and provide consistent, repeatable mold positioning
- Ejector couplings connect ejector systems automatically without manual alignment or fastening
- Multi-coupling systems handle all mold connections simultaneously, including cooling, heating, and control circuits
- Mold change tables and transport carts move heavy molds safely with precise positioning
- Inspection and turning units facilitate mold maintenance without removal from the machine
These systems reduce setup times from hours to minutes, increase machine utilization, and improve operator safety by eliminating heavy lifting and manual connections. The result is greater flexibility in responding to customer demands while maintaining high efficiency standards across various industrial applications.
Ready to transform your injection molding efficiency? Contact our application engineering team for consultation on implementing customized quick-change mold solutions for your specific production requirements.