

Troubleshooting injection molding defects requires a systematic approach to identify root causes and implement targeted solutions. Common defects include warping, sink marks, flow lines, short shots, and dimensional variations. The key is understanding how material properties, processing parameters, and mold design interact to cause specific problems, then adjusting the most impactful variables to restore part quality.
What are the most common injection molding defects and how do you identify them?
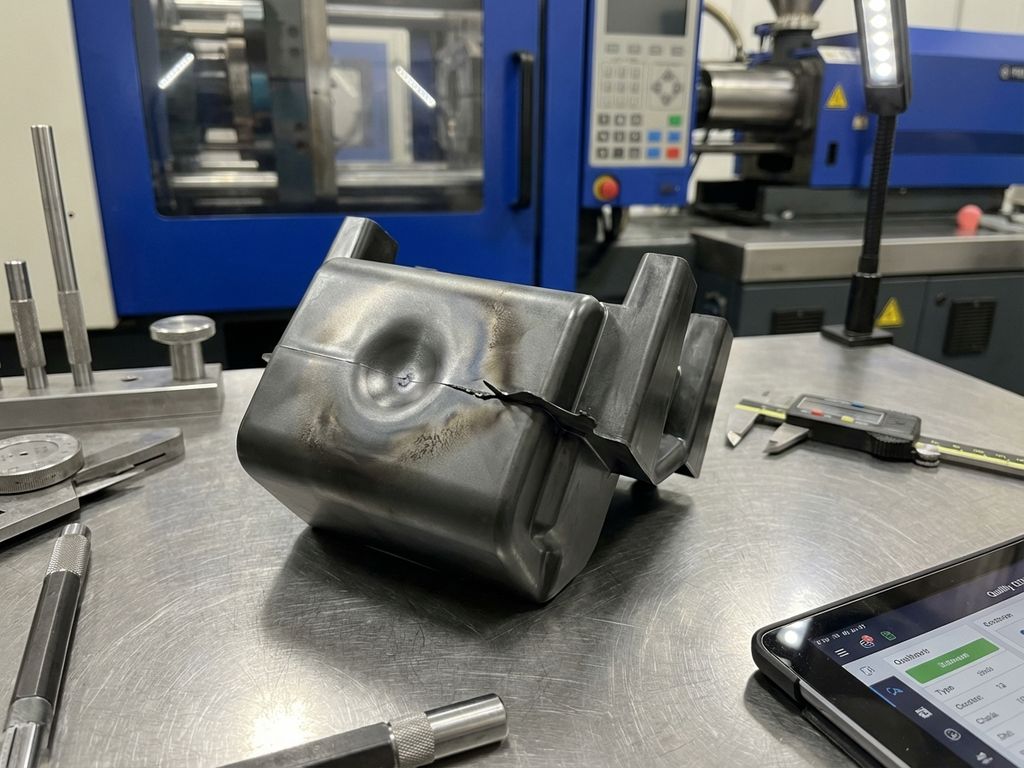
The most frequent injection molding defects include warping (visible part distortion), sink marks (surface depressions), flow lines (visible flow patterns), short shots (incomplete filling), flash (excess material), and dimensional variations. Visual inspection reveals surface defects, while dimensional measurement tools identify size and shape issues.
Warping appears as twisted or bent parts that do not match the intended geometry. You will notice parts that will not sit flat or align properly during assembly. Sink marks create visible depressions on part surfaces, typically opposite thick sections or ribs. Flow lines show up as wavy patterns or color variations following the material flow path.
Short shots result in incomplete parts where material did not reach all cavity areas. Flash appears as thin excess material along parting lines or around inserts. Dimensional issues become apparent during quality checks when parts fall outside specified tolerances.
Document each defect type, location, and frequency to establish patterns. Take photographs and measurements to track improvement efforts. Understanding defect characteristics helps prioritize which troubleshooting steps to take.
Why do warping and dimensional issues happen in injection molded parts?
Warping and dimensional problems occur due to uneven cooling and shrinkage throughout the part. Different cooling rates create internal stresses that distort the part shape. Thick and thin sections cool at different speeds, causing differential shrinkage that pulls the part out of shape.
Material shrinkage varies with temperature, pressure, and cooling time. When one area of the part cools faster than another, the resulting stress causes warping. Gate location affects how material flows and cools, influencing final part geometry.
Mold temperature inconsistencies contribute significantly to these issues. Hot spots and cold spots in the mold create uneven cooling patterns. Inadequate cooling channel design or blocked cooling lines worsen the problem.
Processing parameters also play a role. Insufficient packing pressure allows more shrinkage, while excessive injection speed can create flow-induced stresses. Hold time and cooling time must balance productivity with dimensional stability.
How do you fix surface defects like sink marks and flow lines?
Surface defects typically resolve through adjustments to processing parameters and part design. Increase injection pressure and packing pressure to reduce sink marks. Extend packing time to compensate for material shrinkage. Raise melt temperature to improve flow and reduce flow line visibility.
For sink marks, focus on the thick sections causing the problem. Increase packing pressure in these areas or modify the part design to create more uniform wall thickness. Add ribs instead of thick sections where possible.
Flow lines often disappear with higher melt temperatures and slower injection speeds. The material flows more smoothly, reducing visible flow patterns. Adjust gate size and location to improve material distribution.
Mold surface finish affects final part appearance. Polish high-visibility surfaces to reduce flow line prominence. Ensure proper mold venting to prevent air traps that can cause surface blemishes.
Material selection impacts surface quality. Some materials are more prone to flow lines and sink marks. Consider grade changes if processing adjustments do not solve the problem completely.
What injection molding parameters should you adjust when troubleshooting?
Start with injection pressure and speed, as these have the most immediate impact on part filling and quality. Increase pressure for short shots or sink marks. Reduce speed for flow lines or overpacking. Adjust temperatures next, then timing parameters.
Injection pressure affects how completely the mold fills and how much the material packs. Low pressure causes short shots and sink marks. Excessive pressure can cause flash and part sticking.
Melt temperature influences material flow characteristics. Higher temperatures improve flow but can cause degradation or longer cooling times. Lower temperatures may not fill thin sections properly.
Hold pressure and time control material shrinkage compensation. Insufficient hold pressure allows sink marks and dimensional variations. Too much hold pressure can cause overpacking and part sticking.
Cooling time balances cycle efficiency with part quality. Insufficient cooling causes part distortion when ejected. Excessive cooling time reduces productivity without quality benefits.
Make one parameter change at a time to isolate the effect. Document each adjustment and the resulting part quality to build troubleshooting knowledge for future issues.
How do mold design and maintenance issues cause injection molding defects?
Poor mold design and inadequate maintenance create many injection molding problems. Cooling channel blockages, worn surfaces, and damaged components directly impact part quality. Gate restrictions, venting problems, and alignment issues also contribute to defects.
Cooling system problems cause temperature variations that lead to warping and dimensional issues. Blocked cooling channels create hot spots, while scale buildup reduces heat transfer efficiency. Regular cleaning and maintenance prevent these problems.
Worn mold surfaces affect part finish and dimensional accuracy. Damaged parting lines cause flash, while worn gates restrict material flow. Surface corrosion or pitting transfers to molded parts.
Inadequate venting traps air in the mold cavity, causing burn marks, short shots, and surface defects. Vent channels must remain clean and properly sized for effective air evacuation.
Mold alignment problems create parting line mismatch and dimensional variations. Regular inspection and adjustment maintain proper mold closure and part consistency.
Establish preventive maintenance schedules to address wear before it affects part quality. Train operators to recognize early signs of mold problems that require attention.
How EAS change systems help with injection molding defect prevention
EAS change systems significantly reduce injection molding defects by enabling faster mold changes and better mold maintenance practices. Our quick mold change solutions minimize setup variations that often introduce quality problems during production transitions.
Our systems help prevent defects through:
- Consistent mold positioning – Precise alignment reduces parting line issues and dimensional variations
- Faster changeovers – Reduced setup time allows more thorough mold preparation and inspection
- Improved mold handling – Safe, controlled mold movement prevents damage that causes defects
- Better maintenance access – Quick removal enables thorough cleaning and maintenance between runs
- Standardized procedures – Consistent setup processes reduce human error and quality variations
These systems are particularly effective across various injection molding applications, helping manufacturers maintain consistent quality regardless of part complexity or production volume requirements.
Ready to reduce injection molding defects and improve part quality? Contact us today to discuss how our quick mold change systems can optimize your production process and minimize quality issues.